The stitches are increased evenly along the row.
My favourite crochet stitch is half treble.
ie. wool around hook, hook into loop, wool around hook, pull wool through loop, wool around hook, pull through all three stitches.
note: Australians follow British and European terminology. American single crochet stitch equals British double crochet stitch.
My half treble would be half double crochet in America.
The unit pattern is crochet twice into three loops and then once into the fourth loop. 4 stitches become 7.
To make 12 or 13 stitches into 21, it is handy to make yourself a list of multiples of 12, ie, 12, 24, 36, 48, etc,
to keep track of the skip 13th stitch, when needed.
If one loses count, it is easy to track back how many loops are missed.....
Back in 2010 my seashells were made with the equation Fn = 2F(n-2) + F(n-3)
eg 89 = 2 x 34 + 21 etc. easy to increase stitches etc.
When you need to decrease, ie. make 89 into 55, you need to reverse the unit pattern.
Crochet once in loop, miss one loop; 3 times, crochet once in 4th loop. 7 stitches become 4.
Similarly, to make 21 become 13, do the unit pattern in reverse, then make an extra stitch in last loop.
If you wish to knit the model, you can work backwards.
You can make one or more plain rows between the increase rows, etc.
It is very much trial and error, as you can see by the following story.
You get to see what works best by making many kinds of variations until something succeeds.
Insert 20/5/2014 This might help you to knit or crochet a Pattern
See where you knit one or knit twice in the same stitch. Good luck.
This image shows what the seashell looks like inside. Very thin inner edge and thick opening area. This needs to be factored in to the Crochet or Knitting Pattern. Otherwise the inside can be too bulky.
****************************************************
2. Here is the very first model of this type that I made last year:-
Half was knit in wool and half was with fine sewing machine cotton.
Image 1 shows how a real shell looks inside. The column is wafer thin!
Image 2 shows this exactly! model is at half stage work, ie 89.
Image 3 shows what Image 2 looks like, flat out.
Image 4 has "top" sewn on; made separately. Corner is curled under to make spiral.
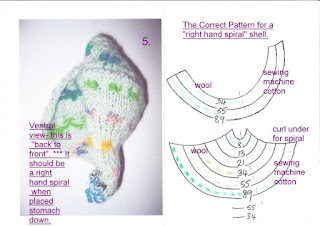
Image 5 is "under view". And it is back to front! It should be right hand spiral.
Easy to get it muddled up, especially when one tries to work Pattern backwards....
Image 6 shows how it should be done. In fact, it might be better if only one quarter of the model were to be worked in fine sewing machine cotton.
**********************************************
3. This next little knitted model is also back to front.
Actually if it were to be stitched up with the inside outside, then it would be correct, that is if you don't mind the inside being outside!
The opening lip is maybe too big, and one would have to adjust the way of making.
***********************************************
4. Here is a knit and a crochet model. The Pattern is evenly balanced both sides.
The models are a bit bulky, sewed from outside. 144 gets to be difficult; 89 is easiest.
*************************************
5. This model looks rather weird. I actually forget how I made it- it was last year.
Maybe the brown was 233 and yellow was 144 and 89?
*******************************************


No comments:
Post a Comment