Sunday, November 22, 2015

Eternal Protocol, Part 3.

This is to figure out how to assemble the Fibonacci Numbers in 4 stages,  ie  over 4 rows.

please click on images to see them more clearly, and in sequence.  thank you.


Thus, to make 1597 from 987,
increase every 6th loop as required in description, to get 1140.
increase every 7th loop as described to get 1292
then increase every 8th loop to get 1445
then increase every 9th loop to get 1597.

note :  there are 76 or 77 stitches at ends where there is no increase.


----------------------------------------------------


All the above looks as if the Fibonacci Series has a magical elegant  secret within it.
The numbers are so eerily exact!  To many decimal points!
And then It occurred to me that there is a natural Reason.
It is a function of the mathematical action.  As follows.


x/a
(x + a)/a = x/a + 1
(x + 2a)/a = x/a + 2
(x/a + 3a)/a = x/a + 3
(x/a + 4a)/a = x/a + 4 = y/a

************************

18/12/2015  In 8 stages:-


In 16 stages:-


---------------------------------------------

Eternal Protocol Part 2, continued.

Here we have a model using the protocol of two stages.

610,  494,  377,  305,  233,  188,  144,  117,  89,  etc.

This is just a stylised design of our Earth Planet.

I have added more to this page on 27/12/2015.


This is what it looks like when one crochets it;  one row for each Number.
To eliminate the outer frill one would have to make non decreasing rows in between the KNITTING.
Begin with cast on 610 stitches, with fine yarn is best.  My red here is thicker 5 ply....bulky.  The blue and white and green are 4 ply cotton from my yarn stash.


Please click on images to see more clearly.  Thank you.

This is more like the real true proportions of Earth.
The living section from deepest ocean trench up to the top of atmosphere would be a mere few hairs' breadths.

One reflects that Earth is so precious.  It is unthinkable that we humans might destroy it all.

Dr Michel Odent has written some books on  this,  and I discuss the topic in my blog   http://www.acolourfulpost.blogspot.com

Maybe hardly anyone reads this blog.  Is Google putting a block on some Internet material?  One day I searched for    "a colourful post"  blogspot,  and nothing of mine came up!


__________________________________________________________

Monday, November 9, 2015

An Eternal Protocol For Building One Fibonacci Number into the Next, Part 2.

1.  Building the Fibonacci Series in two stages, namely by making it gradually in the "form" of:-

........13,  17,  21,  27.5,  34,  44.5,  55,  72,  89,  116.5,  144,  
188.5,  233,  305,  377,  493.5,  610,  798.5,  987,  1292,  1597,  etc


Interesting.  This shows that the best way is to round off the numbers to a whole number  ie the lower value   (not  .5 ). 
 Increases (or decreases) may be made 1)  every 3 stitches  ie 3 to 4 stitches;  2)  every 4 stitches  ie 4 to 5 stitches.  Adjust the remainder of stitches needed at the end of the row.


Please click on Tables to enlarge image.  You can then right click and save, copy onto Word, or save link as...a download or favourite.


This is new.  An Equation:-

please click on image to enlarge it, to see it better.


I have been most excited at these discoveries!
Previously it was trial by error to get the numbers right,  but this is exact!  except for the very small numbers at the beginning of the series where we must figure it out simply.

----------------------------------------------------------


Imaginary Fibonacci Ripples,   The blue is a Fibonacci number,  the white is the half Fibonacci number !


So,  the Pattern is to increase every 3rd stitch to make 4,  for the half Fibonacci numbers.  Increase every 4th stitch to make 5 for the real Fibonacci numbers.  Here we have calculated the radius of each circle with circumference equal to the Numbers  and the distance between each band.  
At first I crocheted the last stitch by "hook into loop, crochet 2 chains,  Begin new row.  Single crochet was used  ie  hook into loop, wool around hook, pull wool or cotton through,  wool around hook, pull through all stitches.   There was an ugly join.  A piece of colored yarn was used to keep track of the end of the row.  Often I had to count to check if it was ok.
To make a clean join i just continued on with the spiral, and only the colored yarn marked the end of the row.


*** Please note that UK Europe Australia crochet instructions and gauges are different from American usage.  Please see post of 12/26/2014, "Information for US and UK Crocheters"
******************************************


Calculations for Concentric Circles (Ripples)
iaw the Fibonacci Series and half Fibonacci Series.

Fn                    radius              r1 – r2              rows
2584                411.3               78.5                 79
2091                332.8               78.6                 79
1597                254.2               48.6                 49
1292                205.6               48.5                 49
987                  157.1               29.9                 30
799                  127.2               30.1                 30
610                  97.1                 18.5                 19
494                  78.6                 18.6                 19
377                  60                    11.5                 12
305                  48.5                 11.4                 11
233                  37.1                 7.2                   7                     
188                  29.9                 7                      7                                             
144                  22.9                 4.3                   4
117                  18.6                 4.4                   4
89                    14.2                 2.7                   3
72                    11.5                 2.7                   3
55                    8.8                   1.7                   2
45                    7.2                   1.7                   2
34                    5.4                   0.9                   1
28                    4.5                   1.2                   1
21                    3.3                   0.6                   1
17                    2.7                   0.6                   1
13                    2.1                   0.5                   1
10                    1.6                   0.3                   0
8                      1.3                                           

I have tried another way to upload the Table-  control c to copy document, the control v to paste here.
You can see on the blue and white model, that the last white band has 11 white rows,  this shows it has circumference ...305.
I am unable to see it right!   Very stressful;  I  am working at a friend's place to upload all of this;  no electricity or Internet at home in my caravan.   I shall go away and check on it. 
Something is wrong somewhere.  Maybe the Table needs fixing.  **  Fixed 23/11/2015

A story of me in High School.  Maths class.  Geometry.  early 1960s.  All those of us who got a Theorem wrong in a Test were humiliated;  forced to line up in the middle of the gymnasium at lunch time, for the full hour.  I was having a rough time, unable to see the way the geometry worked.  For the life of me, I could not get it.  Usually I came top in Biology and such,  but this day I had problems.  No wonder I am fated to do blogs on Geometry!
-------------------------------------------------------------------------------------


More 23/11/2015


You can click on the images to see them more clearly.

Right click to save or print.....

From this info you can crochet a flat model of ripples in this fashion,  increasing every 3rd stitch  and then no increase for the required number to attain the half Fibonacci number iaw the Tables.  Increase every 4th stitch  to make 5  etc to make the Fibonacci number.
eg last band, blue is 377 from 305 white.   column 3.
base is 305  ie 72 x 4 = 288 + 17;
increase is       72 x 5 = 360 +17.
Therefore increase every 4th stitch 72 times until 17 loops remain,  and crochet normally the last 17.
So the same for all the Series,  as above.  Good luck.  Any mistakes you might find on my blog, please let me know.  I am always editing and correcting!

*********************a photo still to come...


insert 19/11/2015


This Table is a correct one. 
Some previous info has been rounded off to whole numbers, to make it easier to knit or crochet.


Some Eternal Protocols for Building one Fibonacci Number into the Next, Part 1. *

The description "eternal protocols" describes the essential Patterns we can use when crocheting or knitting the Fibonacci Series.  It is remarkably distinct and I was excited to discover this for myself.


This is the correct Table.


For example.  Take 610  to  987.
We need to add 377 to 610.  Divide 610 by 377 = 1.61803....
So we have to increase a certain number of stitches.
This was figured out in a different way back in 2010.
 the Equation we found was F(n)  =  2 x F(n-2)  +  F(n-3). and it holds here.


This is a simplified Pattern for knitting or crocheting.


Cast on 610 stitches,  
knit in accordance with Pattern,  
you can put one plain row in between each decrease row.
Just make sure the balance is kept, with 2x stitches in the middle.    
When knitting it depends how many stitches fit on the knitting needle;  
work is shaped by decreasing-  working the equation backwards.  
This green work is done in fine crochet cotton.
You can crochet beginning with small numbers.
------------------------------------------------------------------------
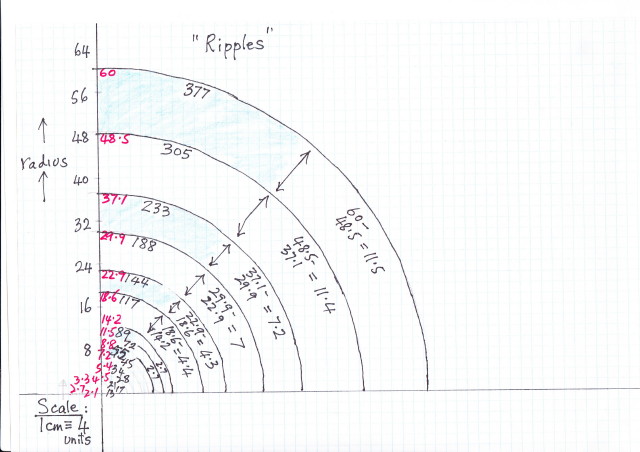
There is a second way to build the Fibonacci Series,  from 2010;  the Vortex.....
unit is 4 to 7  or 13 to 21 as follows:-


Please click on image if you need to enlarge it.

Also, if you wish to copy it, click on it and then right click.  Save as.....doc,  or copy onto Word.
Or save link as....put it in downloads or favourites.

NB.  There is a third way to assemble the fibonacci Series in knit or crochet and it involves the Equation using number 9  or 18;  work is still to be developed.
Reference is 26/5/2011  The Giant Clam.
-----------------------------------------------------------------


This one is 10946 !  Crocheted using  Equation Fn = 2F(n-2) + F(n-3)  as in first description.  It was published 5/3/2011 in Horns, tusks, fangs and thorns, spines ans prickles .


This one is also 10946; 
 placed on a smooth surface, it naturally conforms into a 2 hemisphere, a brain-like shape.


---------------------------------------------

Instructions  for Making a Model of a Spiral "snail like"  Shape.


1. CROCHET

You can use any kind of yarn - eg No 8 crochet cotton, any ply wool

Use crochet hook of desired size - eg No 2

You can do any kind of crochet stitch - single, double, half treble, treble, double treble, etc.


To begin, crochet 5 chains

crochet into 3rd loop twice -makes 2 stitches

****Begin every row with 2 chains.


row 1........ crochet in 1st loop x2, crochet 1x in next loop -makes 3 stitches

row 2........ crochet x2 into next 2 loops, crochet 1x into next loop ---makes 5 stitches

row 3........ crochet x2 into next 3 loops, crochet 1x into next 2 loops ---makes 8 stitches

row 4........ crochet x2 into next 5 loops, crochet 1x into next 3 loops ---makes 13 stitches

row 5........ crochet x2 into next 8 loops, crochet 1x into next 5 loops ---makes 21 stitches

row 6........ crochet x2 into next 13 loops, crochet 1x into next 8 loops ---makes 34 stitches

row 7 ........crochet x2 into next 21 loops, crochet 1x into next 13 loops ---makes 55 stitches

row 8........ crochet x2 into next 34 loops, crochet 1x into next 21 loops ---makes 89 stitches

row 9........ crochet x2 into next 55 loops, crochet 1x into next 34 loops ---makes `144 stitches

row 10........ crochet x2 into next 89 loops, crochet 1x into next 55 loops ---makes 233 stitches


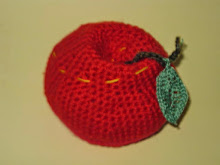
This is enough to make the blue green model of snail in photo this post.

Fold crochet work in half and sew it up, leaving opening such as a snail has. The work configures into a spiral which needs to be gently padded as you go.

You can use any kind of padding such as wool fleece or cotton wool, etc.

2. KNIT
You can use any kind of yarn eg crochet cotton or wool and any suitable size knitting needles. The brown snail in photo was made in 8 ply wool; use No 8 or 11 or so size needles.
row 1........ cast on 233 stitches
row 2........ knit 2 tog x89, knit 55
row 3........ purl 2 tog x55, purl 34
row 4........ knit 2 tog x34, knit 21
row 5........ purl 2 tog x21, purl 13
row 6........ knit 2 tog x13, knit 8
row 7 ........purl 2 tog x8, purl 5
row 8........ knit 2 tog x5, knit 3
row 9........ purl 2 tog x3, purl 2
row 10...... knit 2 tog x2, knit 1
row 11....... purl 2 tog x1, purl 1
row 12....... knit 2 tog
row 13....... finish off.
Fold in half and sew together, gently padding as you go
and you have a nice simple snail model just like the brown model in the photo image here,
in accordance with the Fibonacci series of numbers.
If you are more adventurous, you can make models with 377, up to any Fibonacci Number.

****This last was originally created and posted in 2010.
I am reposting some older material, to make it easier for people to follow the data.


**********************************************